It’s still hot outside, and the salmon season hasn’t started yet, so I decided to take a moment to discuss how to create an invoice in Shopify. There are two ways to do this: you can create an invoice for an existing order, or you can create an invoice using Shopify draft functionality.
Before beginning to talk about instructions, surprise, surprise, we need a Shopify invoice app for this. In general, all Shopify invoice generator apps should do the job. The only thing is, if the app can’t print a draft, you will need to create an order before you will be able to create an invoice. If it’s hard to understand what that could mean, don’t worry, I will explain later in this post.
How to Create an Invoice in Shopify for an Existing Order
It is not difficult at all to create an invoice for an order. The order status doesn’t matter — it can be already paid or still pending. It depends on the purpose of the invoice.
To create an invoice, as I mentioned before, we will need any Shopify invoice app. These apps, often are also called Shopify invoice generator apps, but they all serve the same purpose. Any of them will work with Shopify orders.
The Shopify doesn’t offer a built-in option to create an invoice by default, but If you’re looking for a free option, the Shopify Order Printer app works well. One advantage of the new 2024 version of the app is that you no longer have to leave the order page to create an invoice. Previously, there was an annoying redirection to the app page.
Step-by-Step Guide on How to Create an Invoice for Order
So we can create an invoice using Shopify Order Printer app in these four simple steps:
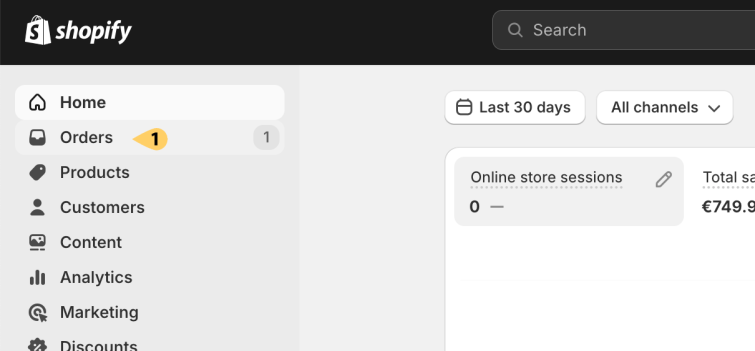
1. Go to Shopify Admin and click on the “Orders”(1)

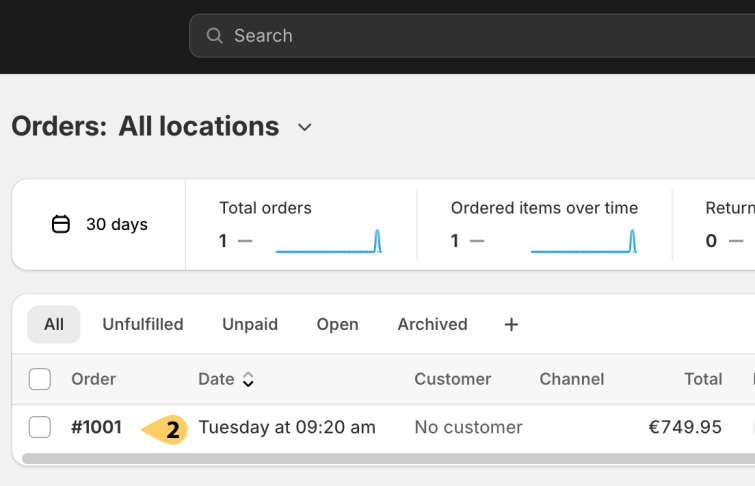
2. Then, click on the specific order(2)

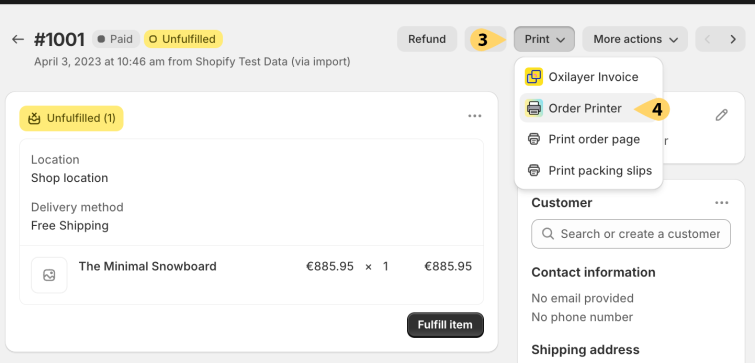
3. Click on “Print”(3) and then “Order Printer”(4)

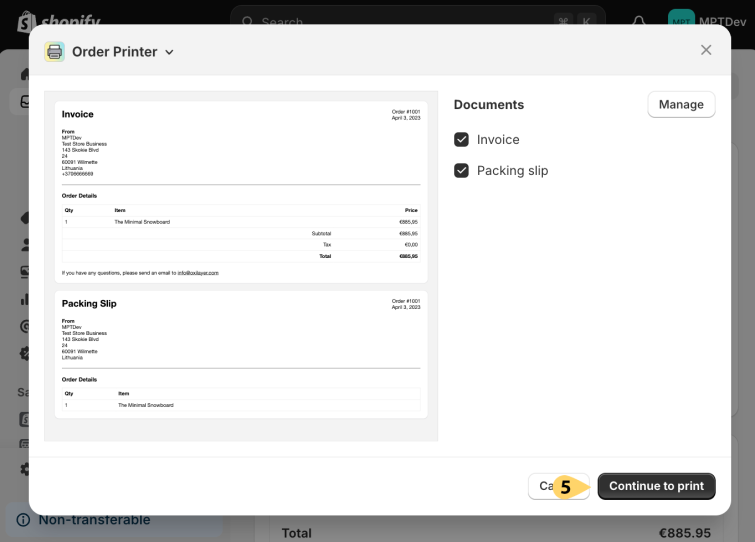
4. The last step is to click on the “Continue to print” button

Depending on your device, available options will vary, but most of them have the choice to save the invoice as a PDF or directly send it to the printer
If you want to change the invoice content, you can customize the template HTML code here:
Apps > Order Printer > Templates > Invoice
It offers a wide range of customization options if HTML doesn’t intimidate you. Additionally, you can use Shopify’s liquid variables in these templates.
How to Create an Invoice in Shopify Using Drafts
We can also create an invoice in Shopify using the draft functionality, which allows you to create an invoice without creating a new order. What also is fantastic thing, that Shopify generates the link of checkout for customers, so they can finish the checkout and create the order by themselves
So, here’s the full picture of how invoices should be created and processed:
- You receive a request from the customer.
- You create a draft in Shopify admin.
- Add the checkout link to the invoice.
- Send the invoice to the customer (preferably as a PDF rather than just an email).
- The customer creates the order and pays for the goods.
Step-by-Step Guide on How to Create an Invoice Using Drafts
As mentioned earlier, you can create an invoice in Shopify using the draft functionality. This can be done in five simple steps:
- Go to: Shopify Admin > Orders > Drafts > Create Draft.
- Add the products by clicking the “Browse” (2) button.
- Click on “Customers” (3) and add a customer.
- Save the draft by clicking the “Save” (4) button.
- Generate the invoice using a Shopify invoice app.
Not every Shopify invoice app can create an invoice using draft data, but some of them can. P.S. One of them is our Oxilayer Invoice Generator app.
When you have the right tools, the process is simple. That’s all it takes to create an invoice in Shopify. However, sending the invoice to a customer can be a bit more challenging. I won’t go into the specifics here, as I’ve already covered that in my article: How to Send PDF Invoice in Shopify
So, What is the Best Invoice App for a Shopify store?
There are many Shopify invoice app available, but how do you choose the right one? I hope these key points will help you decide. The following criteria are based on my own experience, which comes from connecting with many merchants over the past 8 years and assisting them with their challenges.
User-friendly template editor
Any default invoice template probably won’t fit your needs, so it’s important that the app has a template editor. I suggest avoiding apps that offer “HTML only” template editors, even if you have HTML knowledge. The editor should also allow you to add additional text, remove unnecessary content, and replace or translate all text. These functions enable basic branding and content optimization.
Tax configuration
Depending on the country, you might need to show item and total prices excluding or including tax, or even both. Moreover, your product prices can be included or excluded from tax. Therefore, it’s important to choose an app with flexible tax configuration.
Quickly accessible
Once everything is set up, you will primarily use the “Print invoice” function. The fewer clicks it takes to create an invoice, the better it is. The best scenario would be if you wouldn’t need to leave the order view page when it’s time to create an invoice.
Automated delivery to customers
Customers typically expect to download an invoice from several places after making a purchase: the customer account page, order confirmation email, and thank you page. To reduce the number of emails from customers with questions like “Where can I get my invoice?” add a download option to all those places. Therefore, it’s important that the app allows you to do this.”
Other sales documents
Some apps can create additional necessary documents for an online store. If you are manually handling shipping, you might want to print packing slips. Some customers might prefer to order via phone or email, so it’s good to have the option to create drafts (quotes). If someone requests a refund or returns a product, having the option to print refunds and return forms will also be very helpful.
Metafields
Choose an app that supports metafields. Sooner or later, you might want to add additional information about a customer, order, or product to the invoice. For example, customer TAX/VAT number, estimated delivery time, or any other information necessary for your business. It’s nice to have this flexibility. Moreover, those apps will be more compatible with other apps because metafields are used to share data between them.
How to create an invoice using the Oxilayer app
I highly recommend trying our Oxilayer PDF Invoice Generator app. Built on the same knowledge base, it meets all those key points and offers even more.
If I still have your attention, let me quickly show you how easy it is to create invoices in Shopify using Oxilayer PDF Invoice Generator app.
1. Go to Shopify admin and click on the “Orders”(1)

2. Then, click on the specific order(2)

3. Click on “Print”(3) and then “Oxilayer Invoice”(4)
4. Lastly click on the “Download PDF”(5)
Let me notice, that using the Oxilayer PDF Invoice Generator app, you don’t need to leave the “Order view” page, like in other apps. Find more available options to create invoices in this short video:
You can find more information about the Oxilayer Invoice app on the Shopify App Store. Feel free to try and test it. It’s free to install, so there is no need for any subscription. Moreover, a free plan is available.
And finally, I would like to recommend reading this article to better understand Shopify invoicing : All You Need To Know To Get Paid
Conclusion
Creating an invoice in Shopify is quite easy, but there are many other considerations, such as different business regulations, taxes, automated delivery, and so on… That’s why it’s essential to have the right tools. I’ll wrap up this article here, but I’ll discuss these other topics in future posts.

Edwin